Showing posts with label Beans. Show all posts

Thursday, May 4, 2017

The Quest for Coffee And SHTF

I've done several posts in the past about coffee storage for extremely bad situations, like being without it. I've looked at several commercial packaging techniques, and the steel canisters seem to be your best bet for ease of use. Look for the expiration dates when you have a few minutes to peruse the coffee aisle at your local grocer.

The holy grail for coffee and long term storage is the green coffee bean, which can stay "fresh" for a year stored in a cool dark pantry, without any special packaging or preparation. The shelf life can be extended to 10+ years with storage in mylar bags and an oxygen eater.

First, a quick education in how the green coffee bean progresses to various roasts. The roasting process was taken from Sweet Maria's wholesale coffee supplier. (LINK)

Understanding the different stages of the roast will help you control the flavor of your cup and appreciate how different roasts result in different cup flavors.
  - Yellowing: For the first few minutes the bean remains greenish, then turn lighter yellowish and emit a grassy smell.
- Steam: The beans start to steam as their internal water content dissipates.
- First Crack: The steam becomes fragrant. Soon you will hear the first crack, an audible cracking sound as the real roasting starts to occur: sugars begin to caramelize, bound-up water escapes, the structure of the bean breaks down and oils migrate from their little pockets outward.
- First Roasted Stage: After the first crack, the roast can be considered complete any time according to your taste. The cracking is an audible cue, and, along with sight and smell, tells you what stage the roast is at. This is what is called a City roast.

- Caramelization: Caramelization continues, oils migrate, and the bean expands in size as the roast becomes dark. As the roast progresses, this is a City + roast. Most of our roast recommendations stop at this point. When you are on the verge of second crack, that is a Full City roast.
- Second Crack: At this point a second crack can be heard, often more volatile than the first. The roast character starts to eclipse the origin character of the beans at this point and is also known as a Vienna roast. A few pops into second crack is a Full City + roast. Roasting all the way through second crack may result in small pieces of bean being blown away like shrapnel!
- Darkening Roast: As the roast becomes very dark, the smoke is more pungent as sugars burn completely, and the bean structure breaks down more and more. As the end of second crack approaches you will achieve a French roast.
- Ack!! Too Late!: Eventually, the sugars burn completely, and the roast will only result in a thin-bodied cup of "charcoal water."

During the next 24 hours, the newly roasted coffee beans will gas carbon dioxide, hence the air vents on commercially processed packages of coffee. I have been experimenting with using a hot air popper, and it is ridiculously simply.

The green coffee beans and the roasted beans to first "pop"
I ordered the sample pack from Sweet Maria's which was eight pounds of coffee beans for about $48.00 w/ shipping. Still a very reasonable price, and the best prices that I've found while researching the topic for a few weeks. (more later on prices)

As a Prepper, this is what I would suggest. Order a sample pack from Sweet Maria's and experiment with the different methods of roasting the green coffee beans. You'll also get to learn the different region growing "tastes" and what roasts (i.e. medium roast, espresso) you prefer. I'll be learning to roast the beans using cast iron and an oven over the next few months. 

SOLUTION: You can either order, and store your coffee with mylar and oxygen eaters, or purchase canned green coffee beans from Costco for about $4.00/pound. I haven't tried the coffee from Costco, so I can't testify to it's quality. Any readers have experience with this brand?  Practice roasting the green coffee beans with varying methods. Having the supplies, but not knowing how to prepare/use them is not good logic. 

If things get bad, you'll still have your morning cup of coffee to greet the day.

 
Comments are always welcomed and Keep Right On Prepping - K

Thursday, April 13, 2017

Backyard Potatoes

I had a hour before work to finish up the side yard potato/compost containers. Last year, we had to replace the main water line from the house to the meter, and they dug up quite a bit of the side of the house. The monkey grass was re-purposed to keep the water away from the foundation and move the water towards the backyard.


I cleaned up the old leaves and mulched them with the mower. The leaves will make the base layer, then some sand, followed by the cut potatoes (with eyes). I'll top off the potato cuttings with more mulch and a little bit of soil.


The cages are being kept together with zip ties, so that at harvest time, I can just clip the ties and harvest the potatoes. I chose this area for a few reasons, plenty of light, more soil is needed at this location, easy to watch, plenty of room for runners since this area doesn't get mowed, and close to the faucet.


I'll periodically post throughout the year until the first frost. I've probably started with about three pounds of raw potatoes for this endeavor, plus $13 for the rabbit fencing. Maybe $16 as a start up cost....

I'll start the third container this weekend with the boys as a science experiment.

Keep Right On Prepping - K

Wednesday, April 12, 2017

Backyard Potatoes

In the practice of moving from hoarder to sustainer, I've had an experiment going since this winter with raw potatoes.


These potatoes have been in the pantry since the first frost of last year, and looking kinda tired, but they have sprouts and should be able to produce more potatoes. The idea is to see if these potatoes from the last harvest can be replanted with only storage in a cool dark place.

I'll be putting them into wire fencing containers with sand, and periodically dump bagged mulch from the yard on top of the plants. This should make the plant climb the container while producing more potatoes per square foot. The wire fencing will be connected using zip ties to make the harvest easier.


I also had a bag of older potatoes that I bought a few weeks ago, to compare results. The red potatoes were cut in half, with eyes on each half, and will be dried for 24 hours before planting.

I'll post tomorrow with the final product.

Keep Right On Prepping - K

Wednesday, January 18, 2017

Inflation and The Pantry

A few days ago at my local store, I found that they had my toothpaste on sale for 10 for $10. I bought five to kinda restock my reserves, but was mildly surprised when I rotated my stock. The older toothpaste, that I had bought at $1.00/tube was 6.4 ounces and the new stock was a 4 ounce tube for the same price. Talk about inflation!

We also found a great sale on closeout canned pumpkin (expires Dec 2019) from the holiday season.


At 32 cents a can, I bought 24 cans for the pantry to supplement our 16 cans left over from last year's sale.
What do we do with all this pumpkin? Sweetheart makes these honey pumpkin muffins that the boys love.


Honey Pumpkin Muffins with Cream Cheese Frosting
Makes about 12, adapted from Whole Foods
Ingredients
  • 1 1/2 cups whole wheat pastry flour (or white bread flour)
  • 1/4 cup wheat germ
  • 1 tsp cinnamon
  • 1 tsp ginger
  • 1 tsp baking powder
  • 1/4 tsp baking soda
  • 1/4 tsp salt
  • 6 tbsp sugar
  • 1/3 cup olive oil
  • 1/4 cup honey
  • 1/3 cup almond milk
  • 1 1/4 cup canned pumpkin puree
  • 1 egg
  • 1 tsp vanilla extract
Instructions
  1. Preheat oven to 350.  Line a cupcake tin with cupcake liners.
  2. In a large bowl, whisk together flour, wheat germ, spices, baking powder, baking soda, and salt.  In a second large bowl, combine sugar, oil, honey, milk, pumpkin, egg, and vanilla.  Add this mixture to the flour mixture and stir until just combined.
  3. Pour batter into prepared muffin tins, filling 3/4 full.  Bake until cooked through and a toothpick inserted in the center comes out clean, about 20 minutes.  Cool for 15 minutes on a wire rack, then remove from pan to set aside and cool completely.
Recipe from Eats Well with Others [LINK]

Keep Right On Prepping  - K 


Saturday, January 21, 2012

Grocery Store Strategy One

This post is about how to use the cyclical prices at the grocery store to your advantage.

===Items Needed===
  • Log Book
  • Index Tabs
  • Pencil/Pen
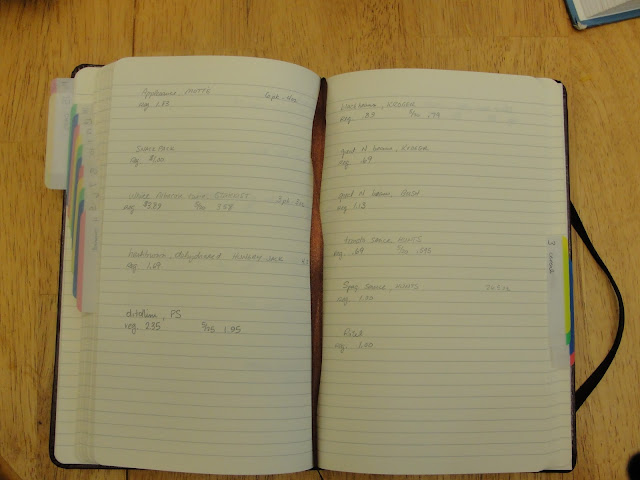
I purchased a lined book at Walmart and also a package of sticky tabs to add to the book. My grocery store has 16 aisles so I added 18 tabs into the book. Usually I start on the right side of the store which is the 16th aisle (milk,dairy,etc...which is the right side of my store), so my first tab is labeled "16 dairy,juice". This allows me to go from front to back through the book as I do my grocery shopping. The last tab is for the produce/bread aisle.

I  also add the item package size or ounces/unit cost and the reg price and date, this helps when shopping at different stores for price comparisons. TIP: Different Color pens/pencil can be used as a legend for different stores. Sale dates are noted under the price with the date.This dating allows you to figure out the length of the sales cycle. Your job is to buy at the bottom, but it will take you at least one sales cycle to figure out the length of each cycle.
You can click the picture to enlarge to photo
The time that it takes to start a book is quite a lot, but takes less time the more it is used, because a lot of the information is already in the price book. It took me about two hours the first two times I went through the grocery store, but on an average trip it only takes about five minutes longer. The idea is to catch your regularly purchased items at the bottom of the cycle. Mouthwash is usually around $2.49 but last time I caught them on sale for $1.00 each. I wrote the sale price and date into my book and bought 10 to get me through until the next cycle. That was about five months ago and I still have five left. When they go on sale again, I'll buy whatever amount it will take to get me to 10 mouthwash again. So, I'm saving around 60% off on this item alone. Now, do this with all of your items that can be stockpiled and add up some real savings. It will take a while to start to see some savings since you are front loading your costs.

Click here for the link to Part Two .